Time of Day / Operating Hours Routing

In this guide, we will walk through a standard deployment of time of day routing, also known as Operating Hours routing.  This is commonly used in Contact Center environments that have open and closed hours, for example staffing the contact center from 8a-8p Monday - Friday.

Time of Day / Operating Hours Routing

Prerequisites

Zoom Contact Center handling inbound calls for your Contact Center

Overview

There are three core components that will be used to build out our time of day routing:

  • Operating Hours

    The Operating Hour configuration element is where you will program when your Contact Center is open.  There are two subcomponents of the Operating Hours:

    • Business Hours - These are your typical standard business hours, for example, you may be open on weekdays from 8am-8pm
    • Closures - These are certain times of the year when you are closed, such as holidays or other planned closures. For example, closed yearly on Jan 1.

    Zoom Contact Center supports multiple Operating Hours schedules that can be created at the account-level and/or Queue level.

  • Queue

    The Queue handles calls that need to be connected to your agents. Queues can have their own Operating Hours schedule. This is useful when you have multiple departments/queues that observe different business hours.

  • Flow

    The Flow contains much of the business logic for your Contact Center.  This includes greeting callers with pre-recorded (or Text to Speech!) prompts, presenting IVR menus to callers, and routing callers into queues (and ultimately agents).  The Flow is also responsible for checking the Operatings Hours and deciding what to do when the Contact Center is open, and what to do when the Contact Center is closed.

Putting it together

While the Operating Hours determines your business schedule/hours, the Flow decides what will happen according to the Operating Hours schedule. In terms of Time of Day routing/Operating Hours routing, it is the responsibility of the Flow to check the Operating Hours. 

The Flow can implement time of day routing in two ways:

Checking Account level Operating Hours schedule

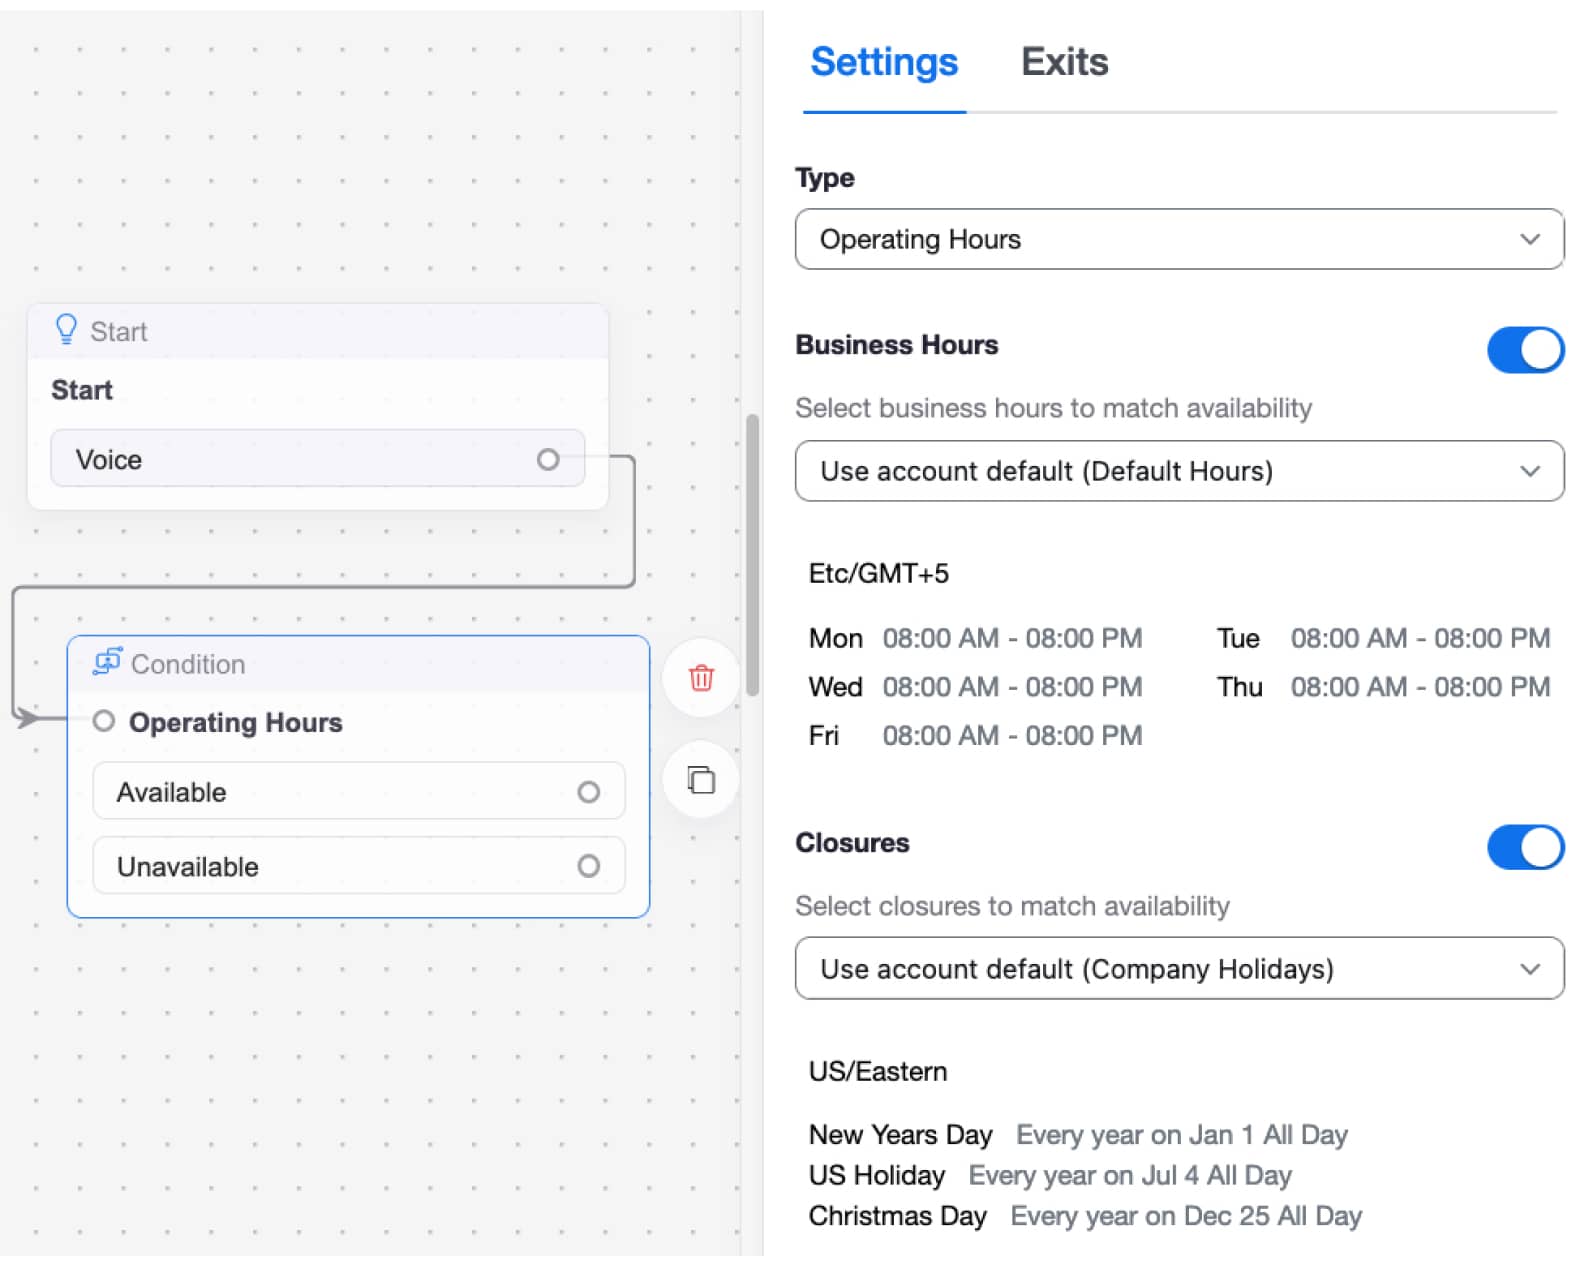
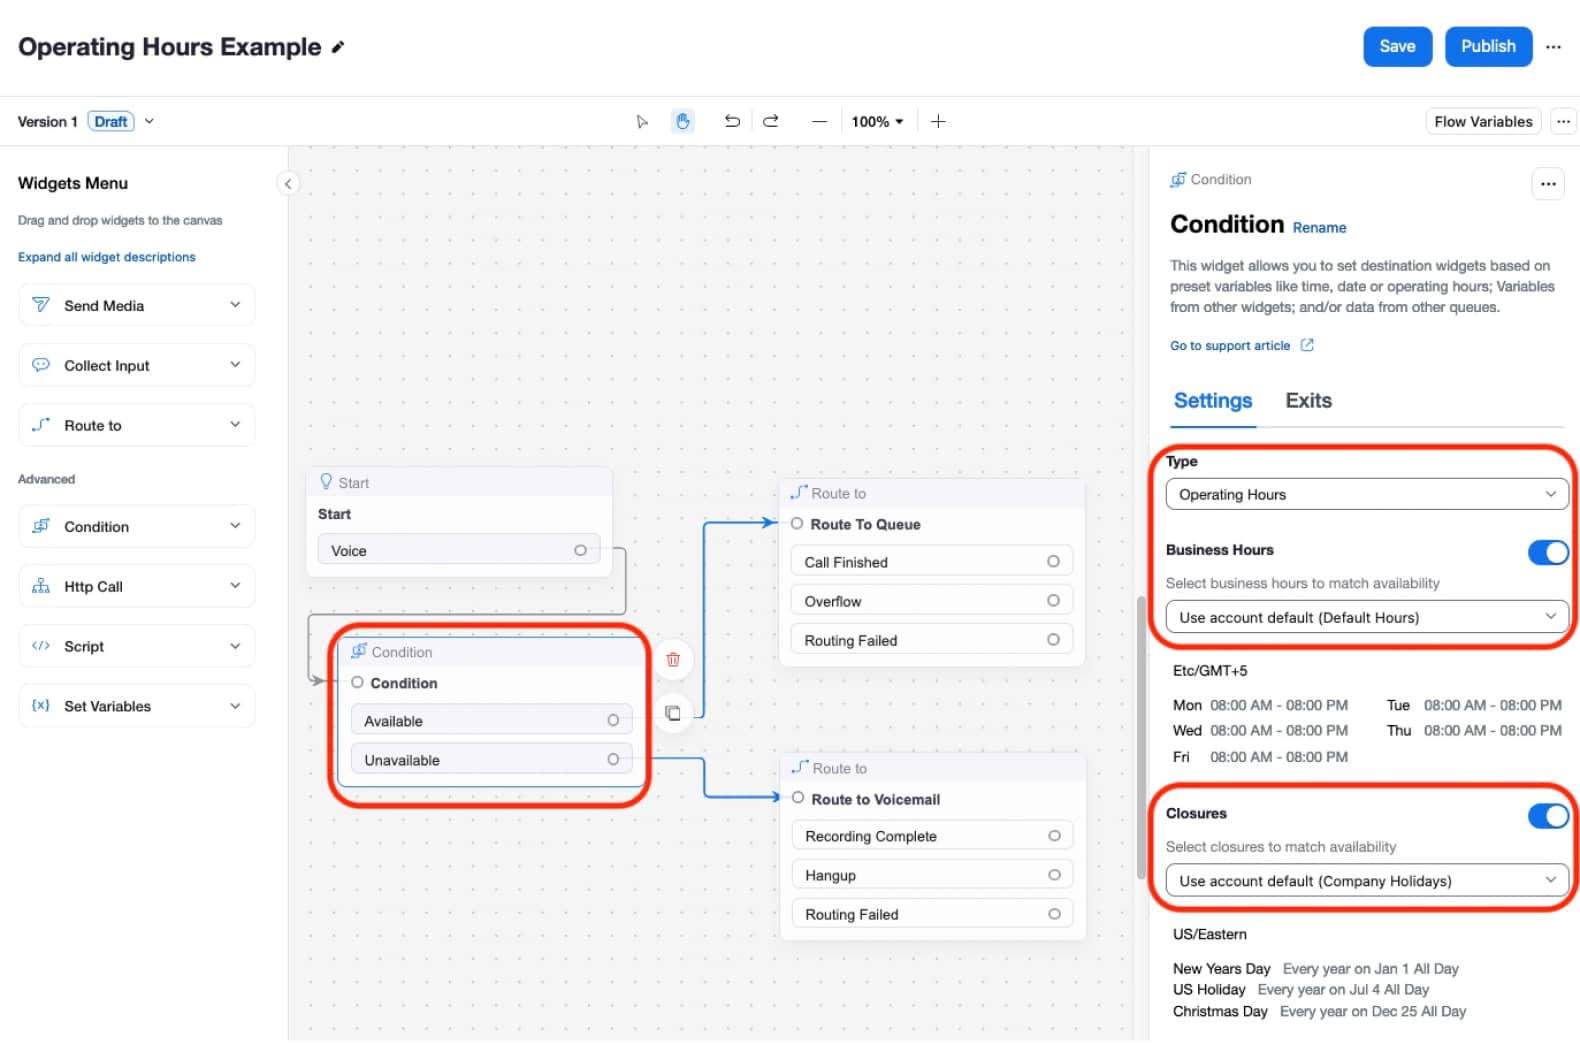
When using account level operating hour schedules, the Flow uses a Condition widget to check the Operating Hours. With this configuration, the Condition widget selects the Business Hours and/or Closures that will be used.  The widget can select from the default account-level configuration, or can select specific account-level Business Hours and/or Closures..  Because this time of day enforcement can happen prior to any selection of a specific queue, any and all queue-level Operating Hours configurations are ignored with this configuration.  With this design, the widget specifies specific Operating Hours configuration irrespective of any queue level configurations.

Operating Hours Example

The above account level Operating Hours configuration is the simplest way to implement time of day checks and is appropriate to use when your entire Flow will either be open, or closed.  However, if your business hours vary by department, using queue-level configurations can be used.

Checking Queue level Operating Hours schedule

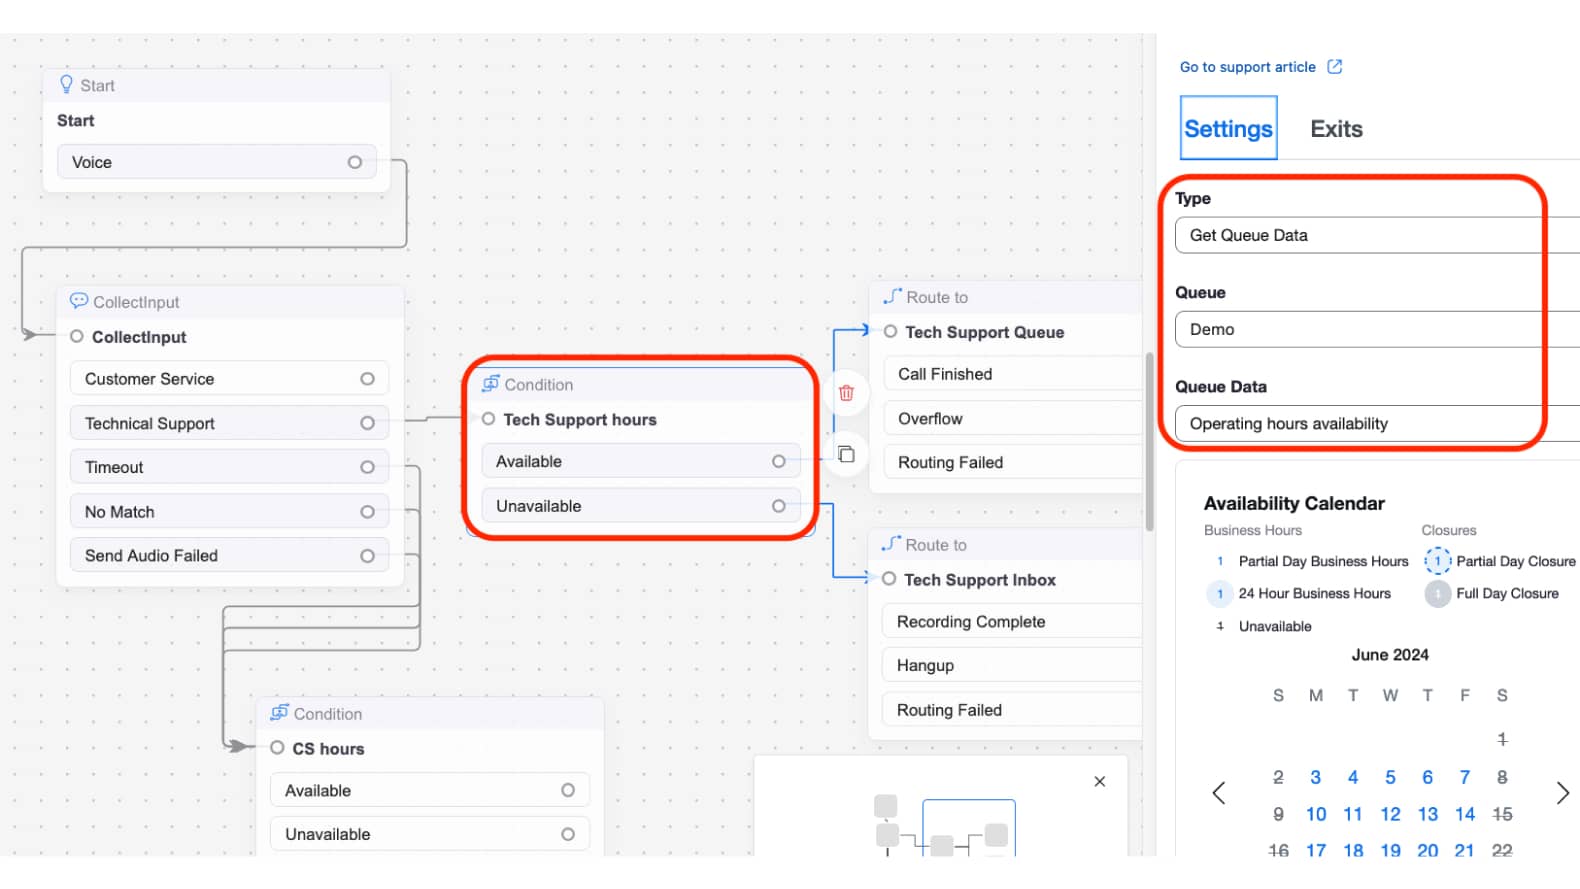
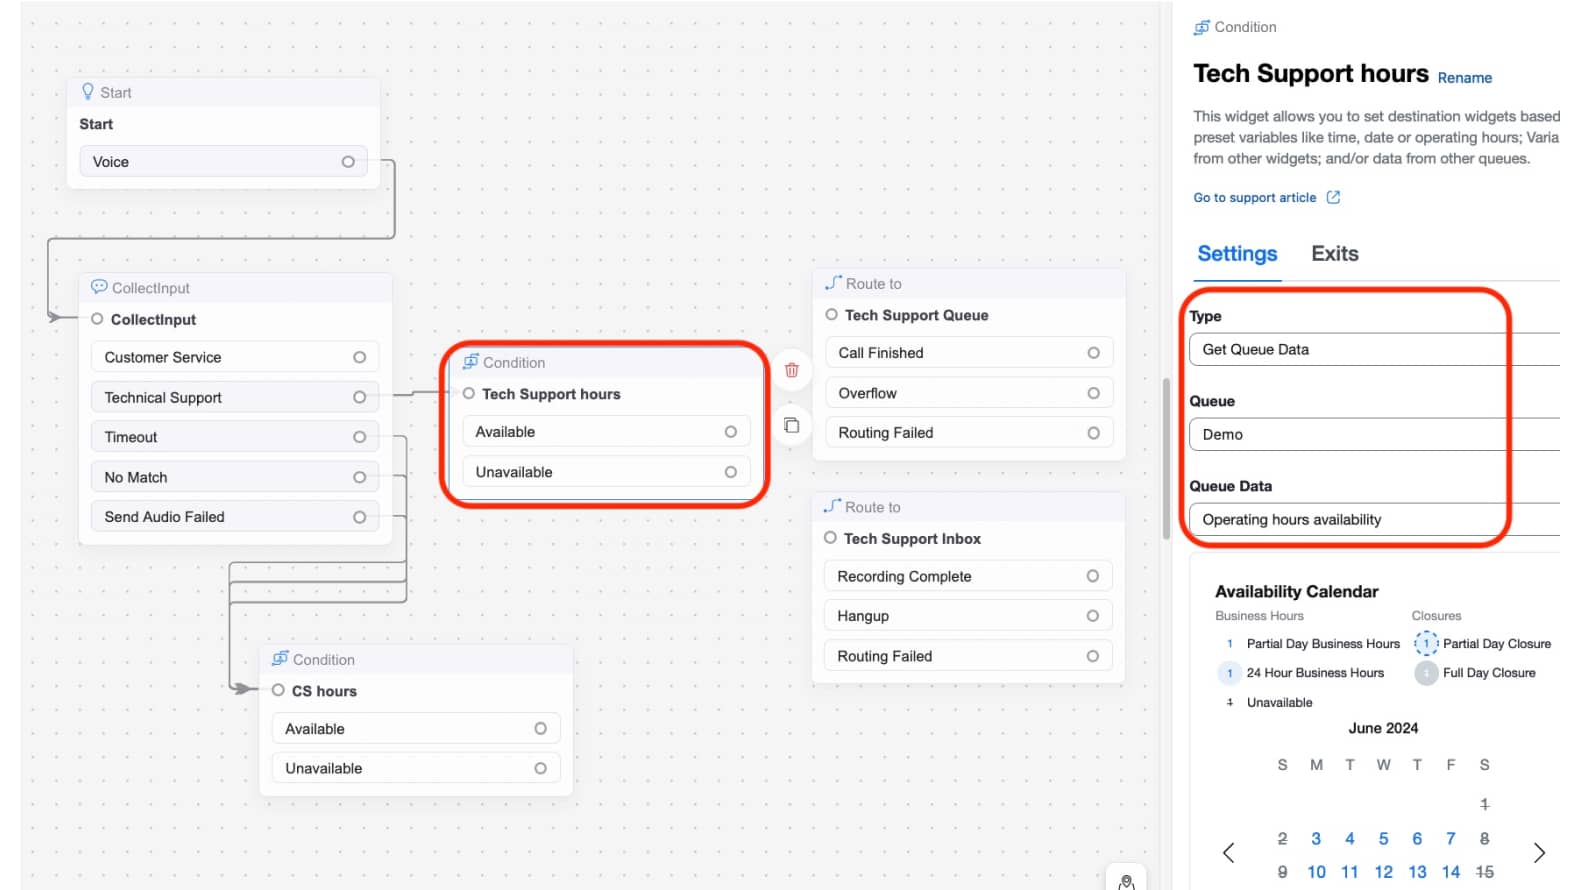
Using queue-level Operating Hours schedule configuration is appropriate when business hours vary between queues/departments. In the below example, callers dialing into the Flow make a menu selection for their queue.  After the selection is made, the time of day routing occurs at the queue level.  The Condition widget uses the Get Queue Data check to select a specific queue and then enforces the business hours configured on the queue.

Checking Queue level Operating Hours schedule

As shown from the Flow examples above, the result of the Flow checking the Operating Hours schedule will either be:


  • Available - A typical Flow configuration for Available is to route callers into the ‘open’ logic, including IVR menus and/or routing to queues/agents.
  • Unavailable - A typical Flow configuration for Unavailable is to route callers to ‘afterhours’ logic, such as closed menus and/or voicemail.

While Operating Hours can be configured on your Account-level and/or your Queue-level, it is always the Flow that decides how to handle the operating hours.

Therefore it is critical to configuring the Flow with your Operating Hours logic, if your Flow is not using the Condition widget to perform the Operating Hours check, you have not completed the configuration for time of day routing!

Combining both Account-level and  Queue-level Operating Hours schedule

Because the enforcement of Operating Hours happens within the Flow configuration, you have the flexibility to choose how your time of day routing is handled.  You can use both account-level Condition checks and queue-level checks together as needed to implement the appropriate business hours logic.

Configuration Steps

For the configuration of the time of day routing/operating hours routing feature, we will build out our business hours using the Operating Hours feature.  Then we will configure our Flow to enforce the time of day routing checks/logic.

Account level Operating Hours

In this section we will complete the default account level operating hours and will apply this to the Flow.  For this configuration we will complete the below high-level steps:


  1. Configure the account level Operating Hours
  2. Update the Flow to enforce the account level Operating Hours

Operating Hours

  1. Navigate on your Zoom Contact Center admin portal to Contact Center Management > Preferences
  2. On the Preferences page, click on the Operating Hours tab
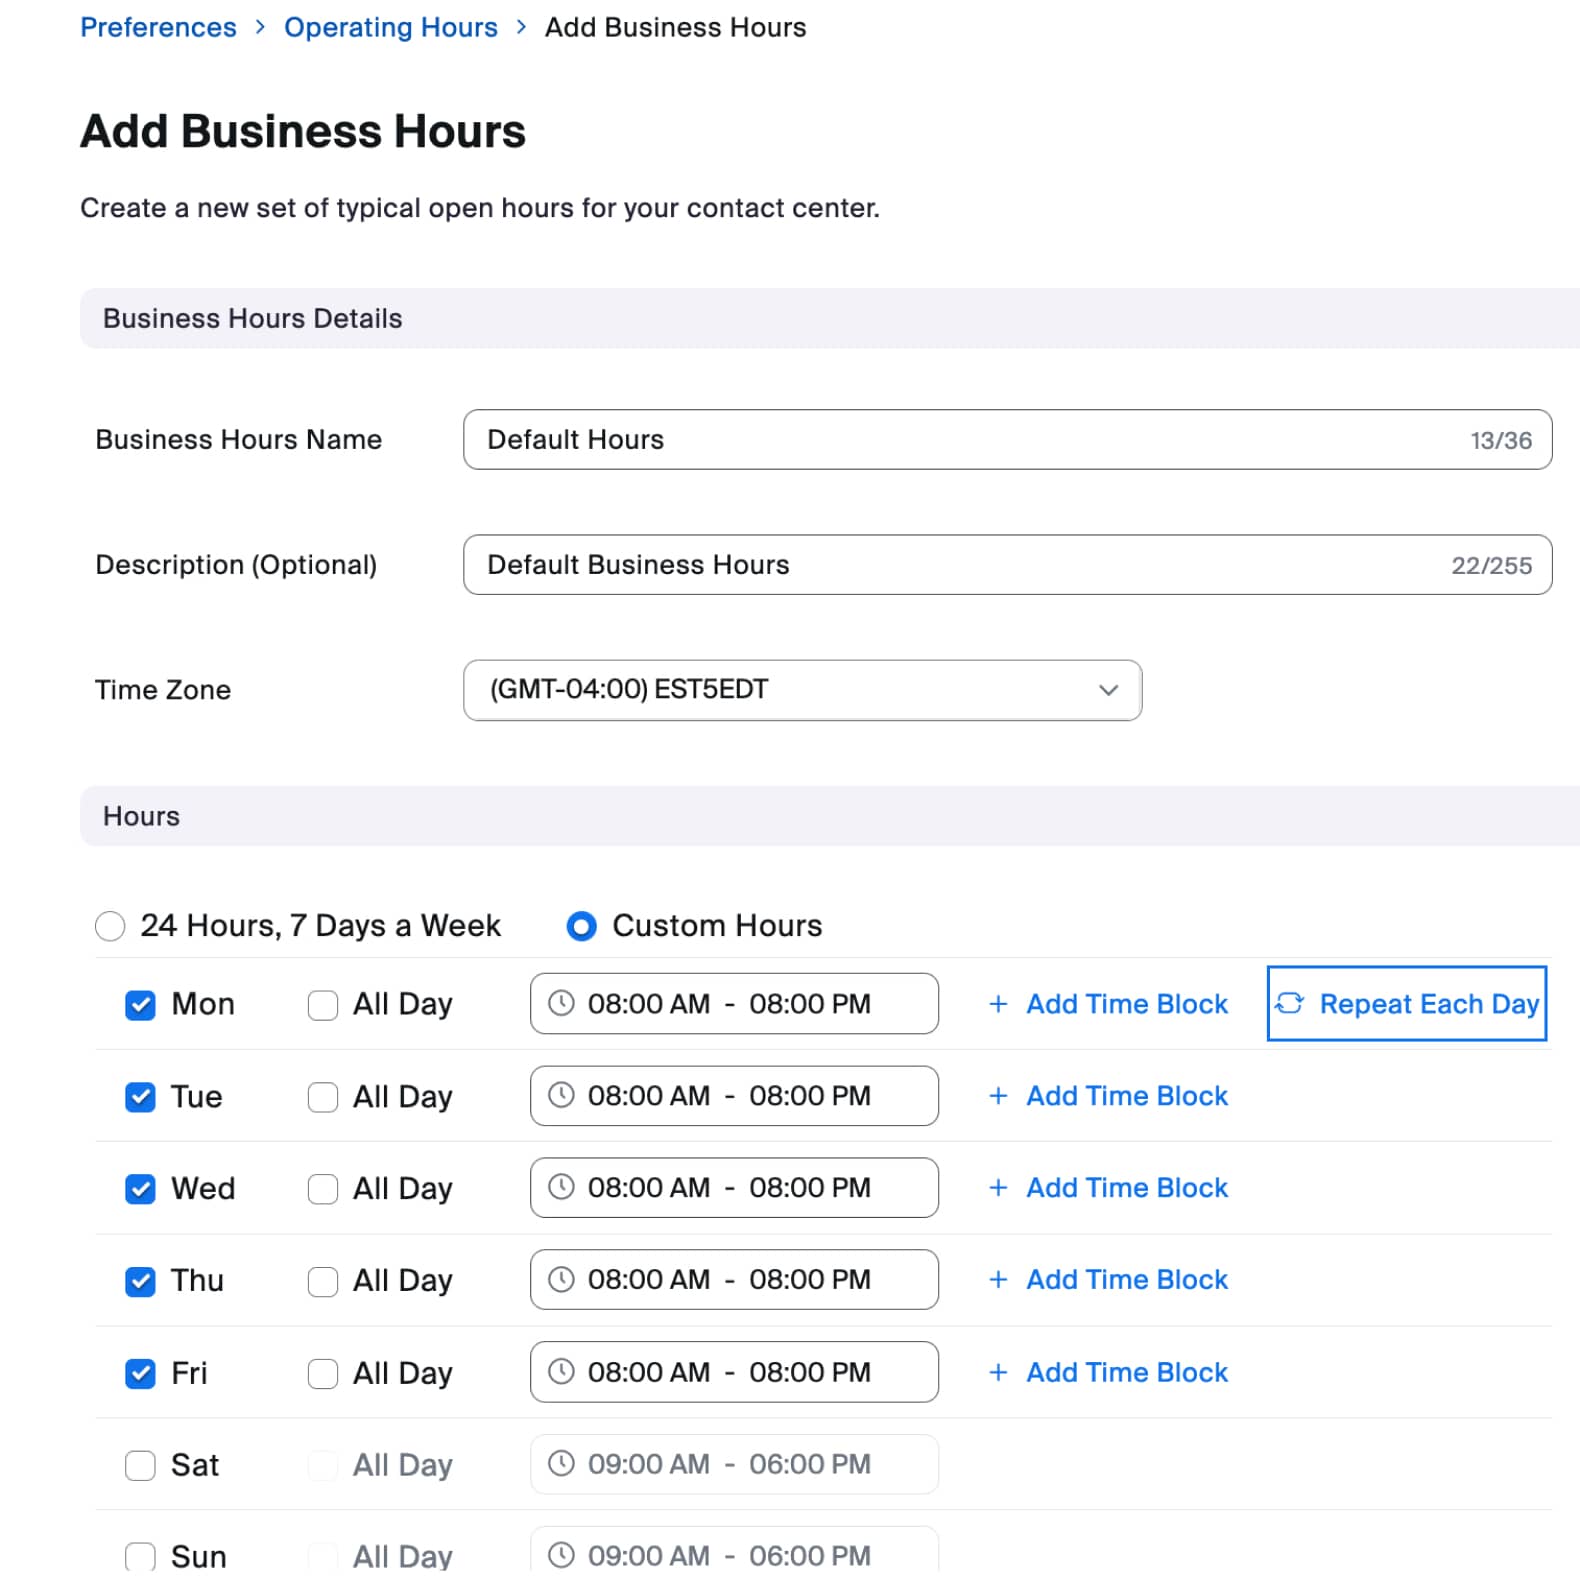
  3. First review the Business Hours schedule. By default you will have a single Default Hours schedule that is open 24x7.  If your entire Contact Center will share a single business hours scheduled, you can simply edit the Default Hours schedule with your typical business hours.  If you have multiple departments, with the majority of the departments sharing the same business schedule, you can also use the Default Hours schedule. Keep in mind that it is the Flow’s responsibility to enforce time of day routing, so if you have any Flows/departments/phone numbers that observe different hours, you can accommodate that later in the Flow configuration. For our example, let’s edit the default holiday schedule and set the hours to 8a-8pm Monday-Friday. 

Add Business Hours


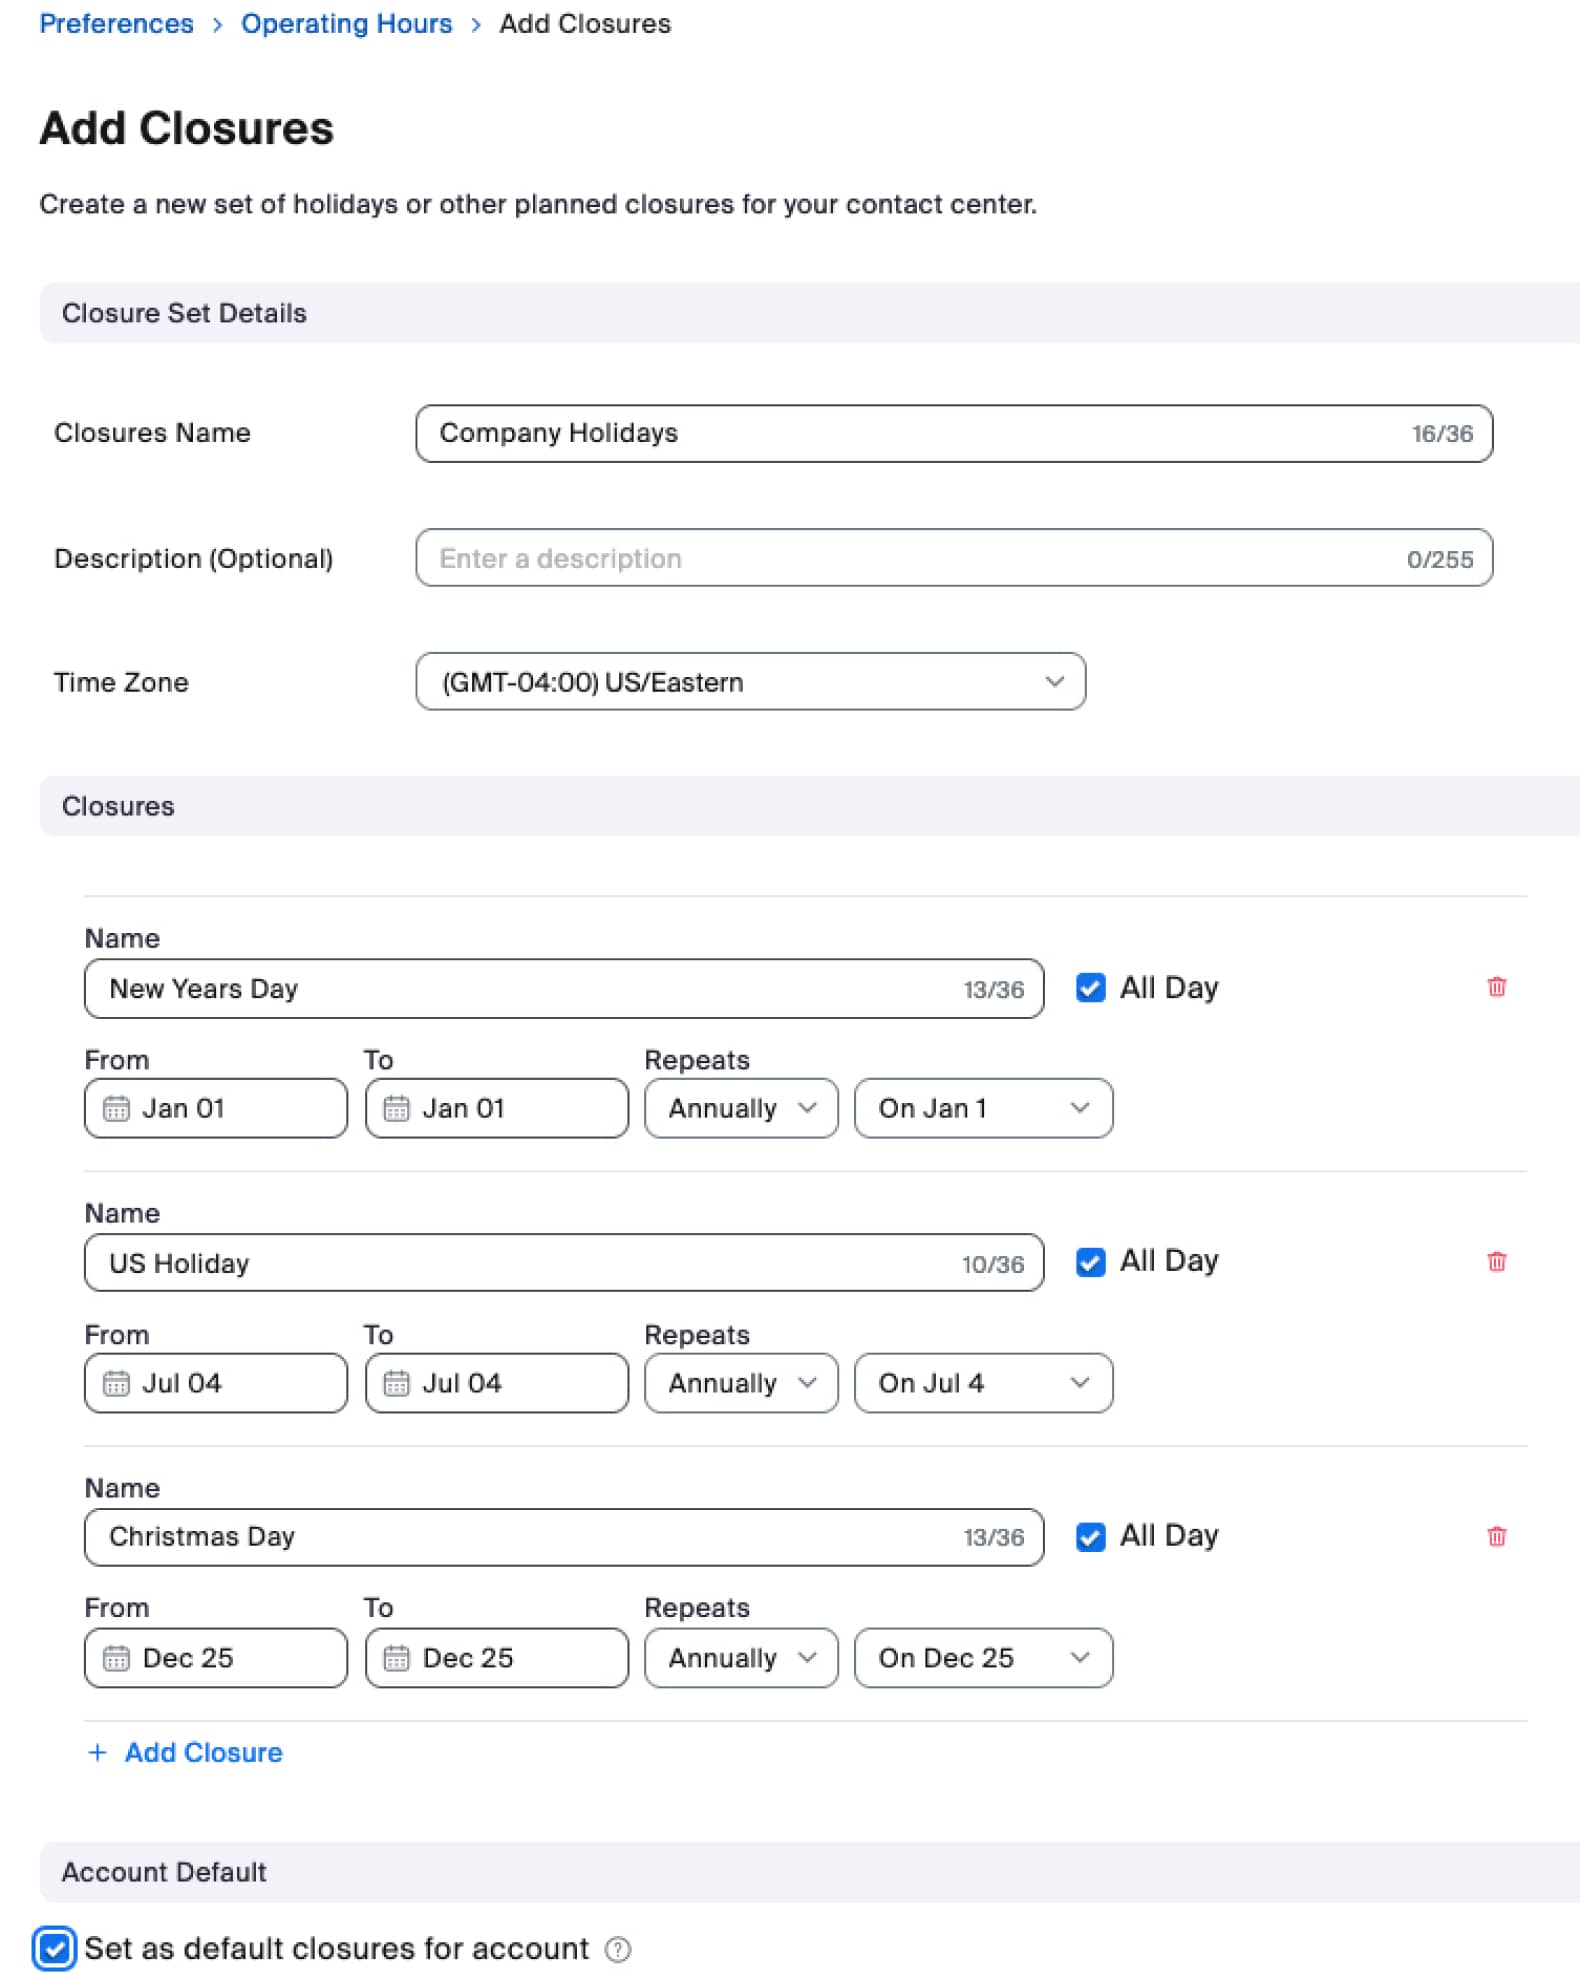
The next step is to create Closures for any holidays or planned closures that need to override your standard business hours schedule. You can create multiple Closure schedules if needed.  Click on the + Add Closure Set button and create your closure according to the appropriate company schedule. For this example, we will create a single closure called Company Holidays that observes several common US holidays.  Note that we have checked the Set as default closures for account as this will be the closure configuration used for the entire business. 


Add Closures

Special Note above Account Default closures: A default closure schedule applies to the entire account, including any queue-level configurations.  Therefore, it is recommended that if you have any special departments/queues that have their own schedule, that you consider this when configuring any default closures.

A special use case example, if you have any queues that are open 365 days a year, you should not configure a default closures as the queue will not have a way to override that default closure schedule.

  1. At this point, we have configured both the Business Hours and the Closures and have now completed the Operating Hours configuration.

Flow

The configuration you implement within your Flow(s) determine whether we check/apply time of day/operating hour logic.  To add Operating Hours checks to your Flow, you will need to use the Condition widget.

  1. Open the Flow where you will implement Operating Hours Check.
  2. Add a new Condition widget to your Flow.
    1. Type: Select Operating Hours
    2. Business Hours: Select/configure the appropriate Business Hours schedule you previously configured
    3. Closures: Select/configure the appropriate Closures schedule you previously configured


Settings


  1. Connect the condition widget’s Available exit to the appropriate Flow logic, such as routing to a queue or open hours menu.
  2. Connect the condition widget’s Unavailable exit to the appropriate Flow logic, such as routing to afterhours menu or voicemail.


Congratulations. You have now completed the account-level Operating Hours/time of day routing.   If you have multiple Flows, make sure that all of your Flows have the appropriate Operating Hours/Time of Day routing configuration.   If all of your departments observe the same operating schedule, then you are finished with the time of day routing configurations once all of your Flows have been configured.  However, if some departments/queues observe different schedules, you can follow the configuration in the next section to handle queue-level hours.

Queue level Operating Hours

In the previous section we configured account-level Operating Hours which is appropriate to use when all departments share the same schedule. This section will discuss using Queue level Operating Hours, which is appropriate when certain queues observe a non-default Business Hours or Closure schedule.

In this section we will complete the queue level operating hours and will apply the schedule to a specific queue.  For this configuration we will complete the below high-level steps:

  1. Configure a new Operating Hours schedule for a specific department/queue
  2. Apply the Operating Hours schedule to the queue
  3. Update the Flow to enforce the queue level Operating Hours

Operating Hours

  1. Navigate on your Zoom Contact Center admin portal to Contact Center Management > Preferences
  2. On the Preferences page, click on the Operating Hours tab.
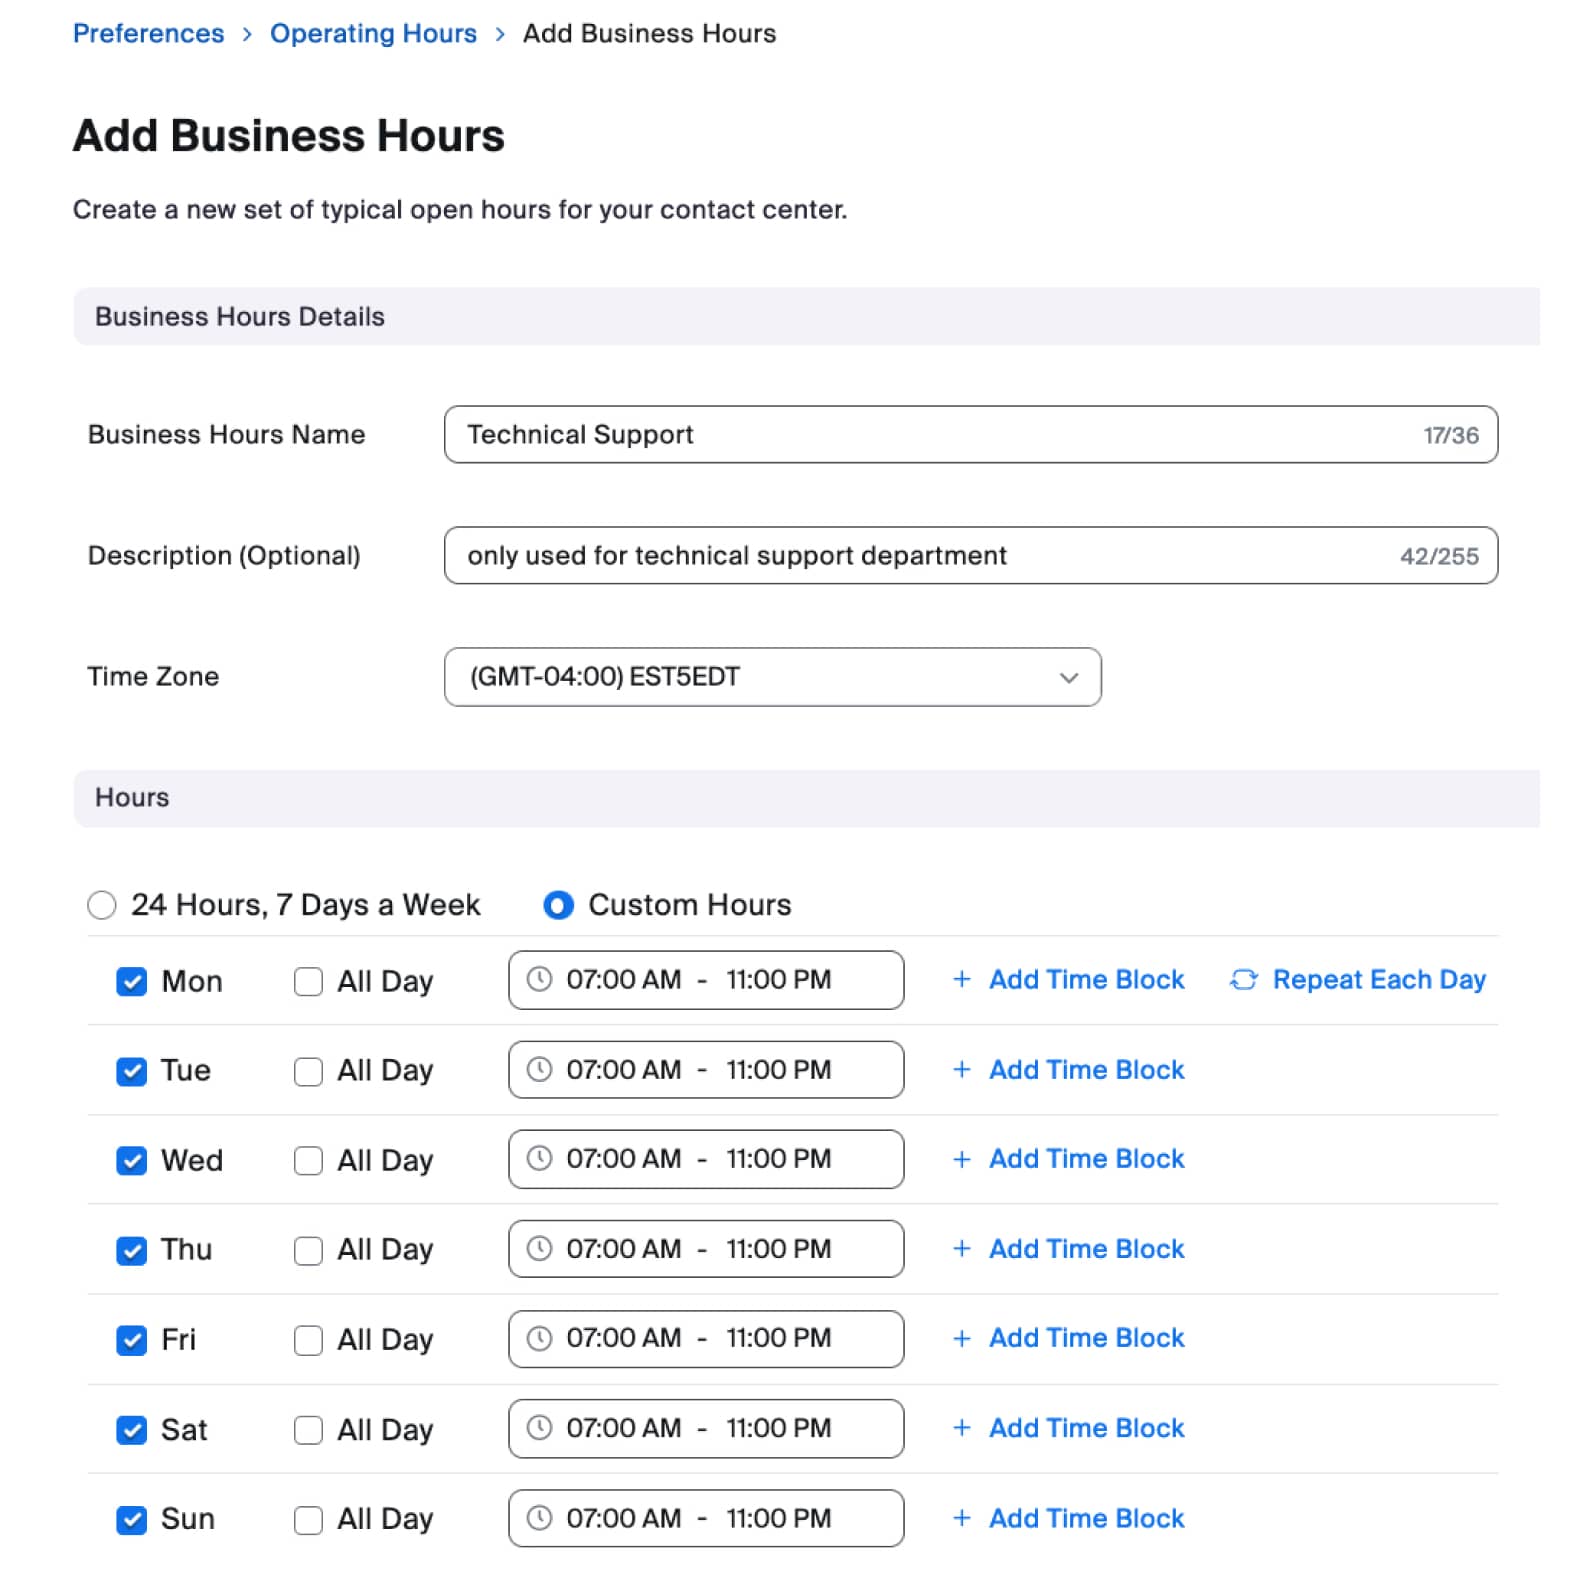
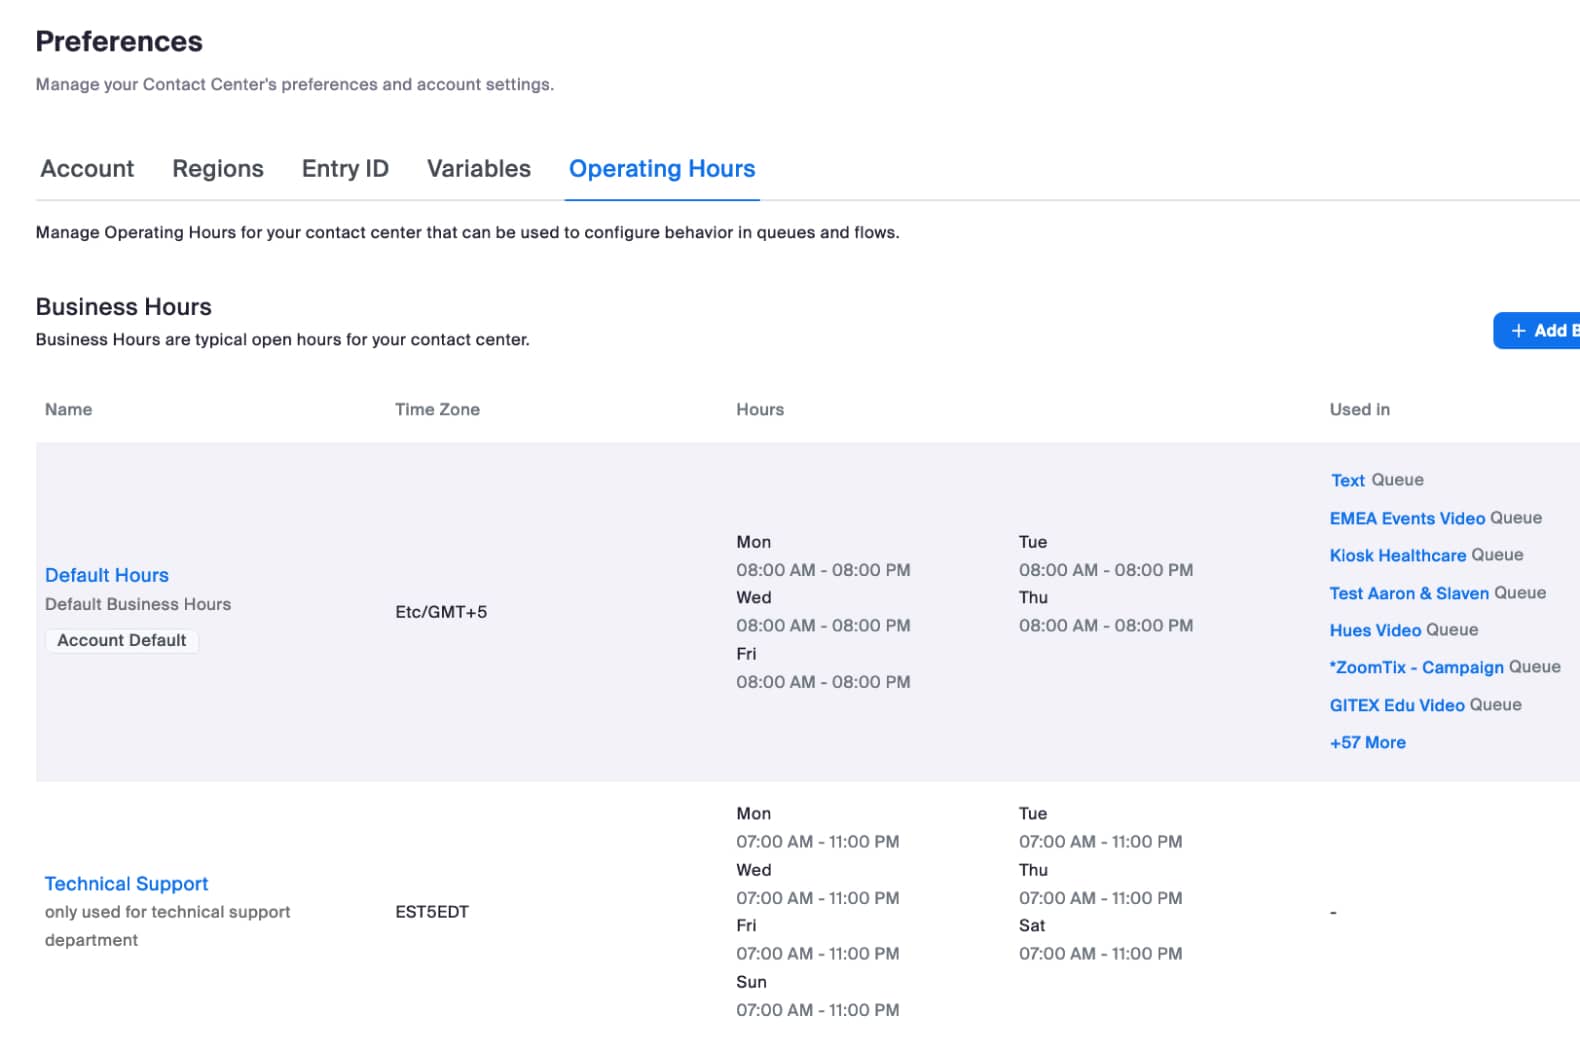
  3. Click the + Add Business Hours button.  In this example, we will create a new business hours schedule for the Technical Support department. This department has different hours than the default, so they need to have their own queue level configuration.
  4. On the new Business Hours scheduled, enter the appropriate hours and click Save.


Add Business Hours


  1. Now you will see both the Default Hours and the Technical Support Business Hours. Note that while we have created the Business Hours schedule for the Technical Support department, as you can see in the Used In column, this has not yet been assigned.  We will do that later in the Queue configuration.


Preferences


  1. The next step is to create Closures to handle any holidays.  In this example, we will not configure any Closure schedule for the Technical Support department since they are open 365 days a year. If you need to observe Closures, you can configure additional Closure configurations as needed for your requirements.

    Note: If you have a department that is open 365 days a year, please ensure that there is no default account-level closure configured, as this will apply to your queue-level configuration.


  2. At this point, we have configured the Business Hours and completed the Operating Hours configuration.

Queue

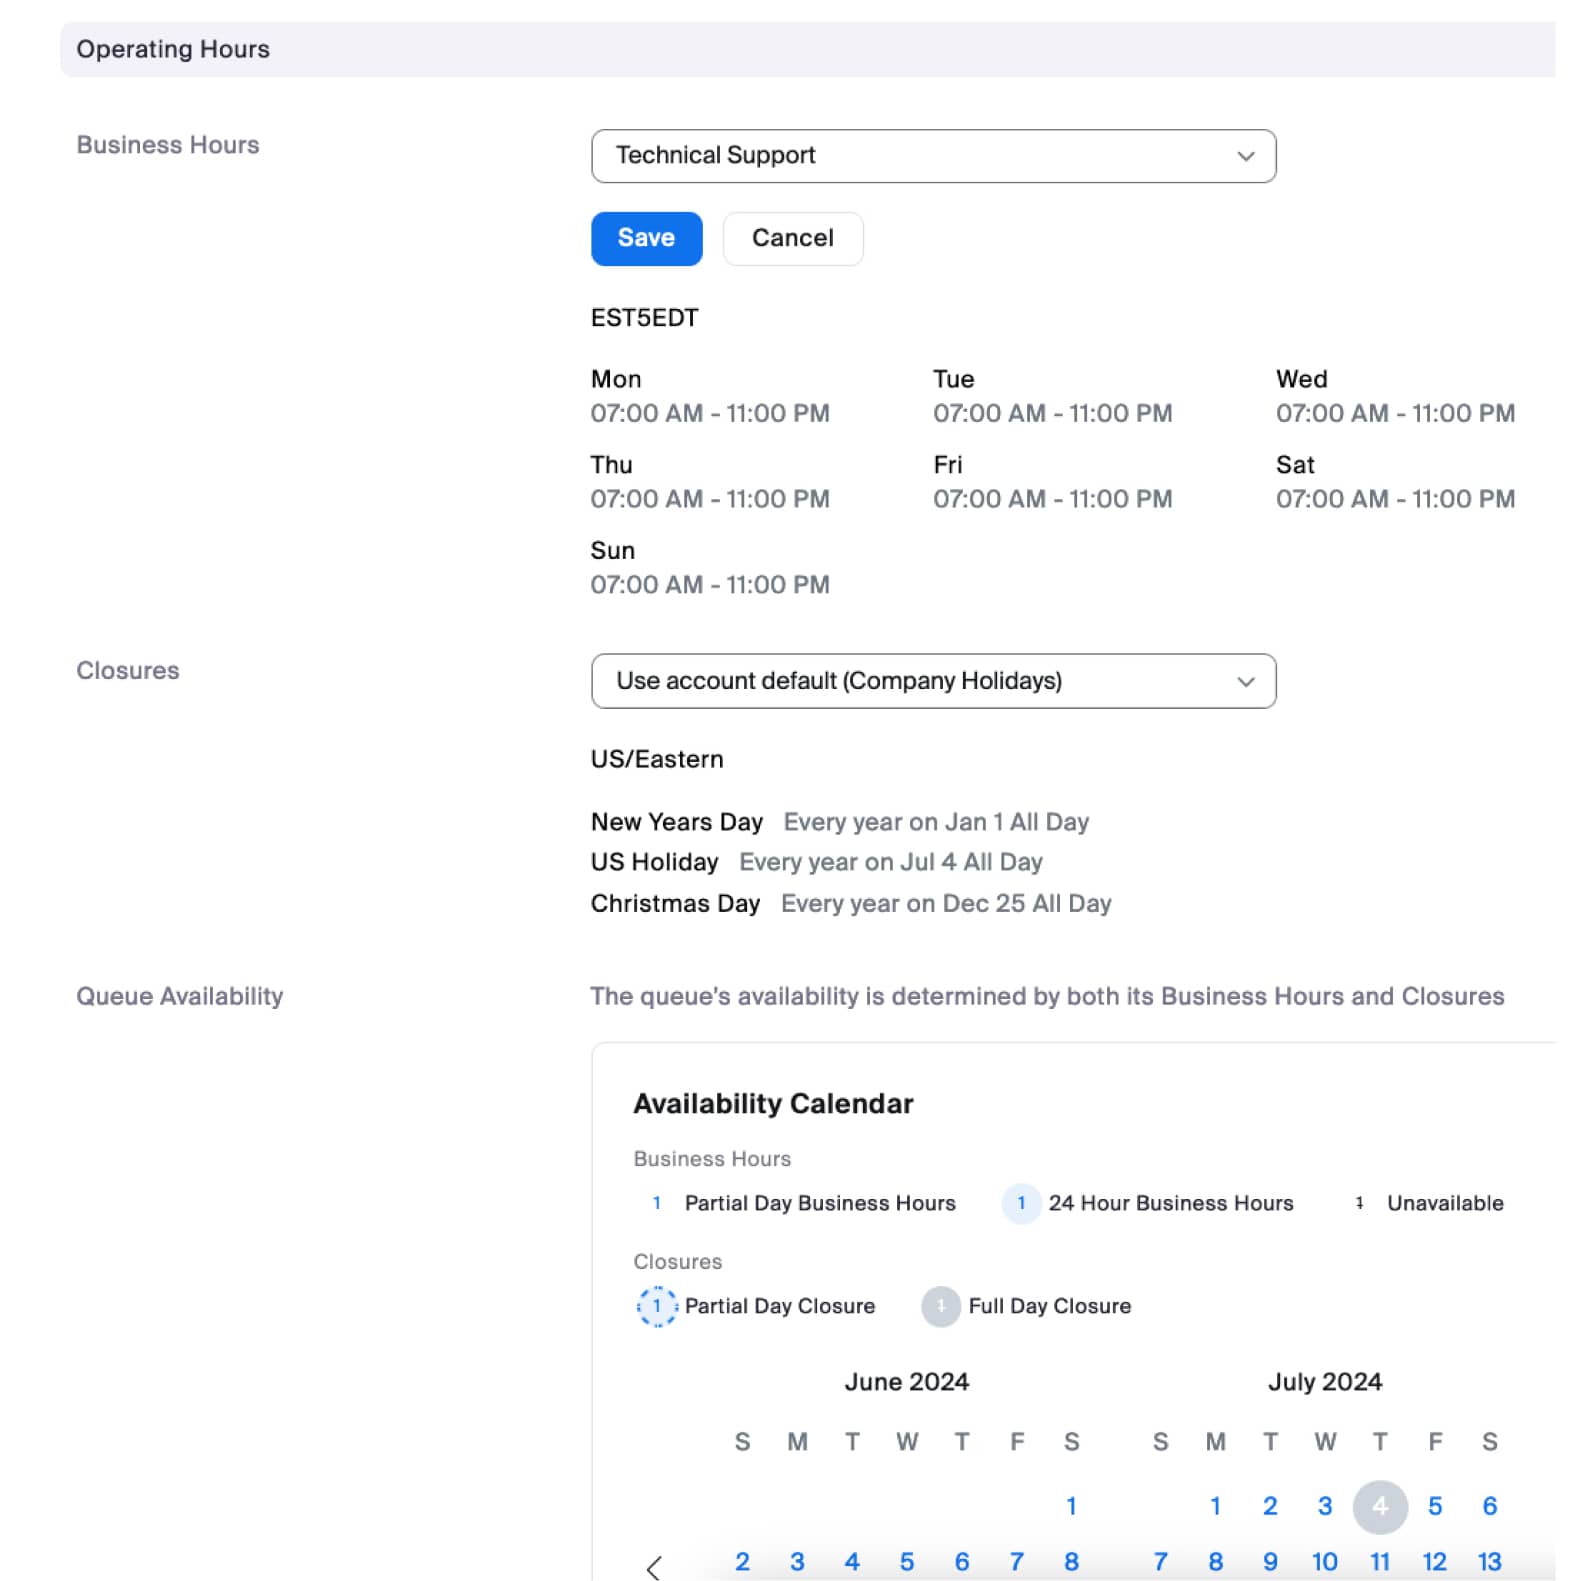
With the above Operating Hours configured we now need to apply the Operating Hours to the queue. In this example, the Technical Support department observes different Operating Hours from the rest of the business.  Therefore, we will assign the Technical Support business hours to the Technical Support queue.  For all the other queues, they will use the default Business Hours which is set by default.  Therefore, this Queue section is only required for queues that observe a non-default Business Hours or Closure.

  1. Navigate on your Zoom Contact Center admin portal to Contact Center Management > Queues
  2. Click on the queue used by your Technical Support department and scroll down to the Operating Hours section.  Locate the Business Hours setting and select the Technical Support Business Hours schedule you created previously.


Operating Hours


  1. Click Save. Now it’s time to move to the Flow configuration to apply the queue-level Operating Hours schedule.

Flow

The configuration you implement within your Flow(s) determines whether we check/apply time of day/operating hour logic.  To add Operating Hours checks to your Flow, you will need to use the Condition widget.


  1. Open the appropriate Flow used by your queue.  In this example, we will open the main Flow, which routes calls for the Technical Support department.  You will need to make sure the below configuration is applied to the appropriate Flows in your configuration.
  2. Once on the Flow editor page, add a new Condition widget to your Flow.
    1. Type: select Get Queue Data
    2. Queue: <select the appropriate queue, in this example we will use the Technical Support queue>
    3. Queue Data: select Operating Hours availability

  1. Connect the condition widget’s Available exit to the appropriate Flow logic, such as routing to a queue or open hours menu.
  2. Connect the condition widget’s Unavailable exit to the appropriate Flow logic, such as routing to afterhours menu or voicemail.


Settings


Congratulations. You have now completed the queue-level Operating Hours/time of day routing.   If you have multiple Flows used by the queue, make sure that all of your Flows have the appropriate Operating Hours/Time of Day routing configuration.

Alternative Configuration

In this queue-level example, we created a Operating Hours schedule, applied it to the queue, and then used the Condition widget’s Get Queue Data configuration to check the queue’s operating hours.  An alternative approach would be to use the Condition widget’s Operating Hours configuration and specify the appropriate Business Hours and/or Closures.
Wrap-up

In this article we covered the concepts and configuration of the Zoom Contact Center time of day routing / Operating Hours logic.  We covered how to configure account-level and queue-level configurations. For both configurations, we discussed how the Flow implements the actual time of day routing by using a Condition widget to check either account-level, or queue-level, operating hours.  It is the Flow that determines what happens when the hours are open, and also what happens when the hours are closed.

The above examples are basic examples, with the concepts you learned in this article you can apply the appropriate configurations to your Flows to implement time of day routing/operating hours check according to your business requirements.